pfSense 2.4 WIFI configuration: a helpful illustrated guide
This article has been last updated on April 12, 2019
There are many tutorials all over the internet for pfSense wireless configuration, but most of them don't seem to work work and the rest is for the previous pfSense versions.
At TekLager we configure wireless for clients almost every day, and this is how we do it.
Prerequisites:
- Have wireless card that is supported by pfSense (for example WLE200NX)
- Make sure your card is properly mounted in the mPCIe slot and the pigtail cables are plugged in tightly
- Your card is detected by pfSense
First, overview of all steps:
- Add wireless interface
- Assign newly created interface
- Configure the interface
- Configure the DHCP for the interface
- Bridge the LAN and WIFI interfaces
- Allow the Wifi interface traffic through the firewall
- Verify
Now, thep by step instructions.
Add wireless interface
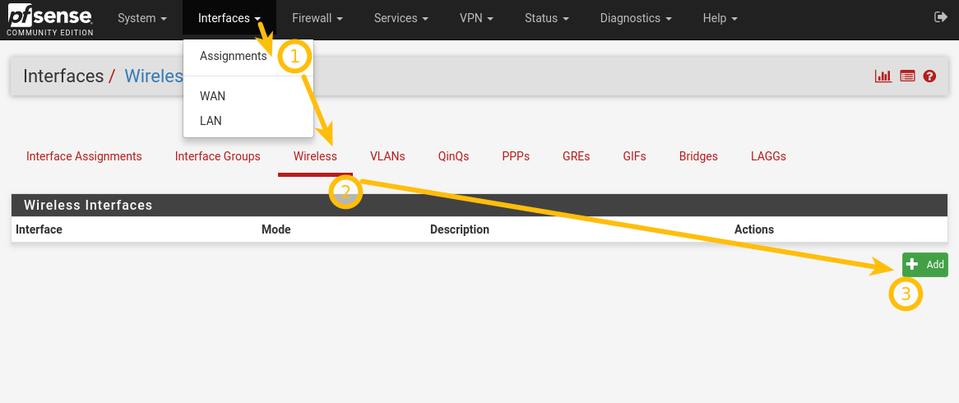
Click Interfaces -> Assign -> Wireless
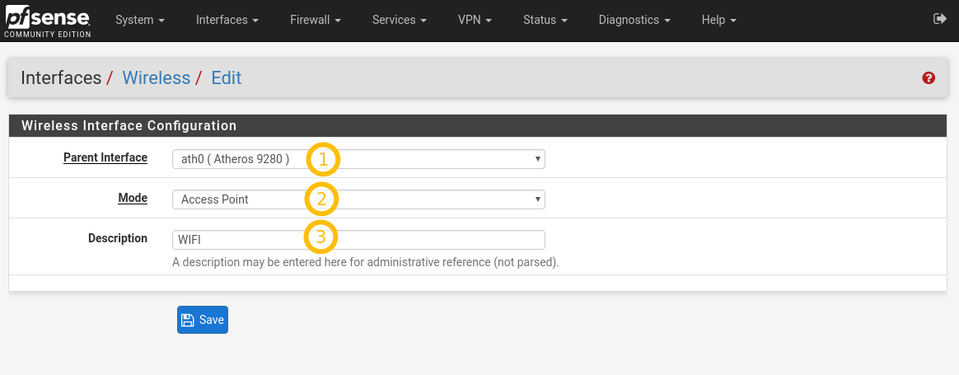
In the "Parent interface" drop-down you should see your wireless card. If this field is empty, your card is either not supported by pfSense or improperly installed.
In "mode" select "Access point".
Assign wireless interface
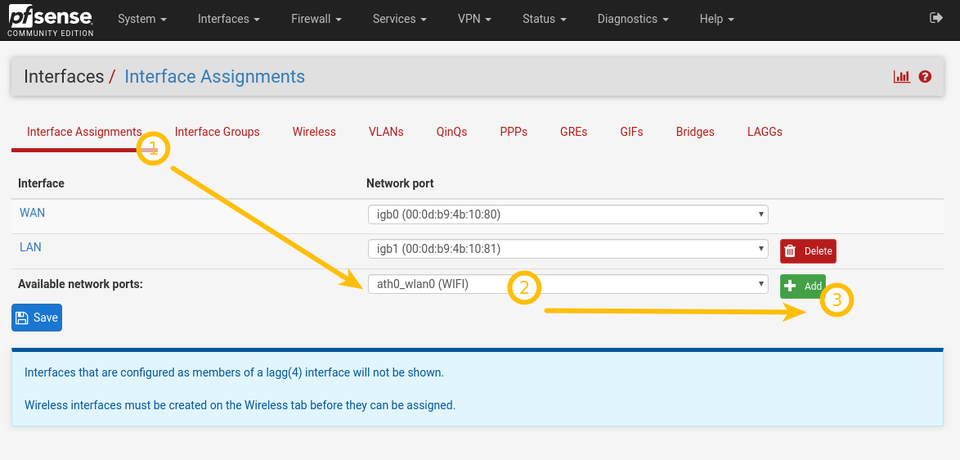
This is somewhat confusing since you already "added" the card. Now you need to assign the interface.
Go to "Interface Assignment", select your newly created interface and click Add.
Wireless interface configuration
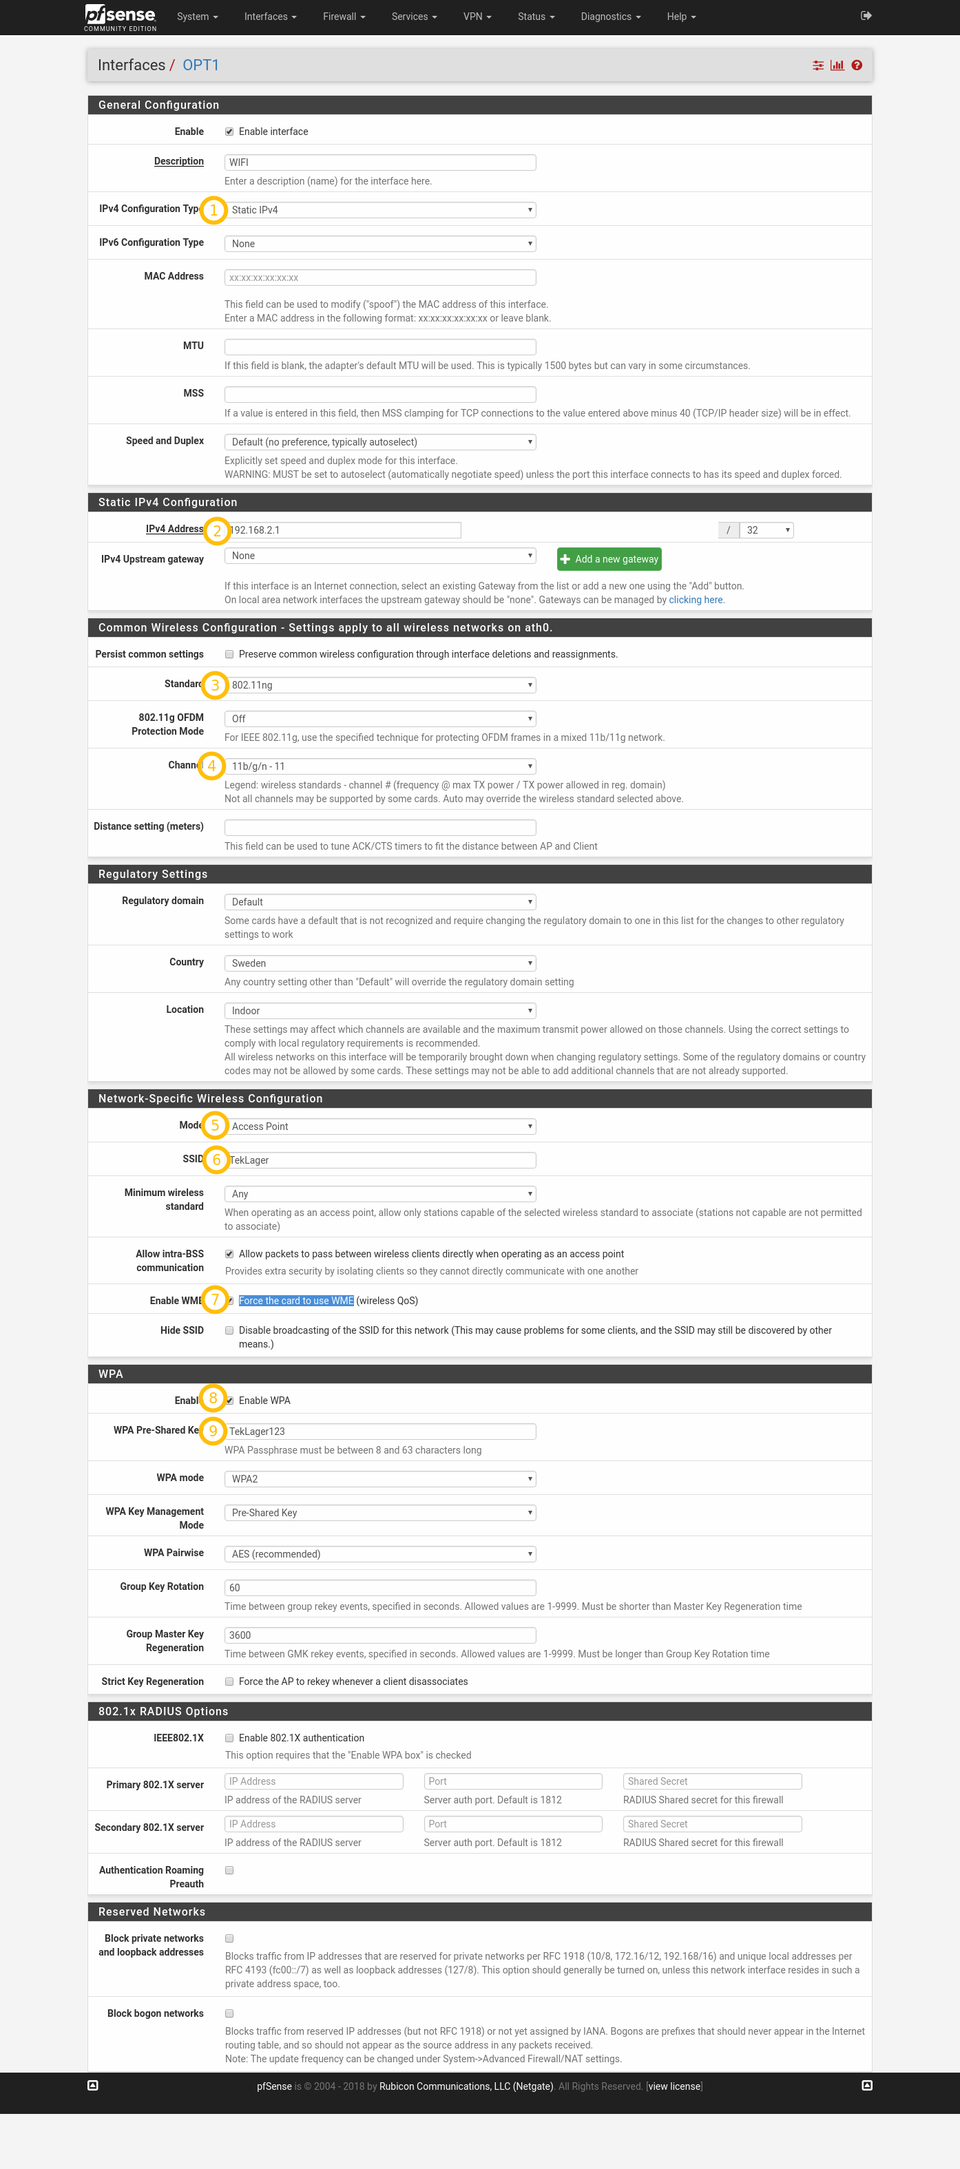
This is where the bulk of the configuration happens. See the detailed screenshot for how we configure the interface by default.
Enable: checked
Description: WIFI
IPv4 Configuration Type: Static IPv4
IPv4 Address: 192.168.2.1/24 (WARNING: screenshot shows incorrectly /32 - don't make this mistake!)
Standard: 802.11ng or 802.11na - (see explanation below in "Which Standard and channel to use?")
Channel: "11b/g/n - 11" or " a/n - 100 " - (see explanation below in "Which Standard and channel to use?")
Mode: AccessPoint - important(!!)
Enable WME: checked (Force the card to use WME) - important(!!)
Enable WPA: checked
WPA Pre-shared Key: TekLager123
Which Standard and channel to use?
If you must connect with old 802.11g devices, you have to choose the 802.11ng mode otherwise your old hardware won't see the new access point.. If you don't have any old hardware that needs to use this access point, then we highly recommend using 802.11na mode because throughput and performance will be much better.
See out throughput test for the different modes in the Wireless throughput test article.
Bridge Wireless and LAN
This step is not stricly necessary, but it's convenient to be able to connect to the LAN hosts when you are on WIFI.
LAN is on 192.168.1.0/24 and Wireless is on 192.168.2.0/24 - if you don't bridge these two networks, you won't be able to connect between LAN and wireless hosts.
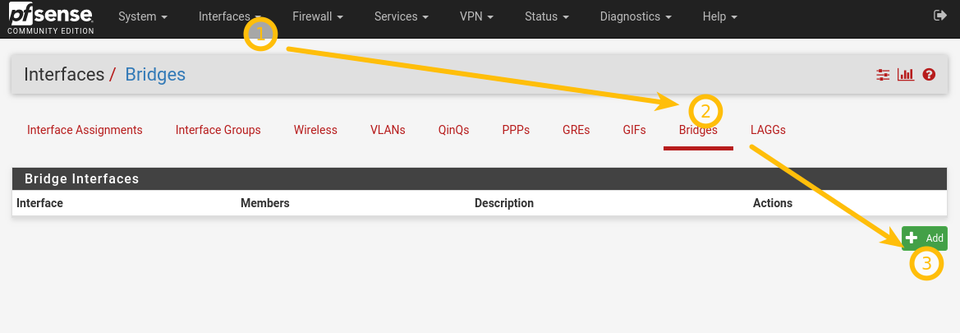
Go to Interfaces -> Bridges -> Add
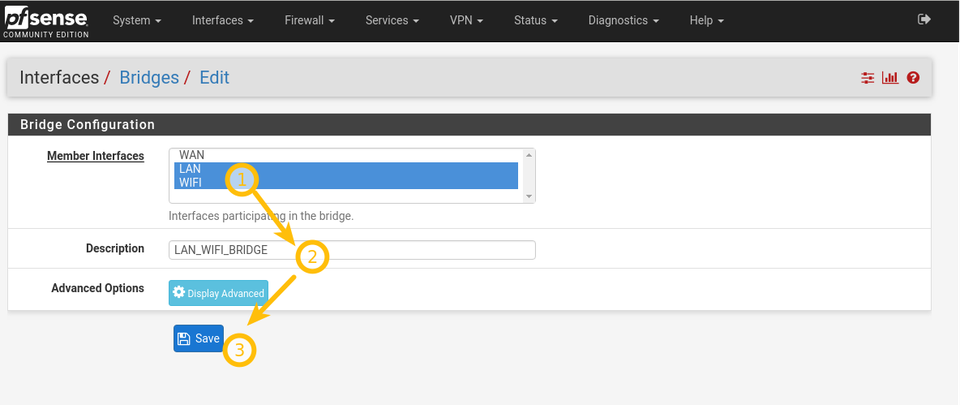
Select WIFI and LAN and Save.
This may take between 10-30 seconds. You may temporarily lose the connection and may need to refresh the browser window.
WiFi firewall rules
It's important to add "pass" rules to the WiFI interface, otherwise all your connections and packets will be dropped.
Go to Firewall -> Rules -> WIFI and add pass ruless.
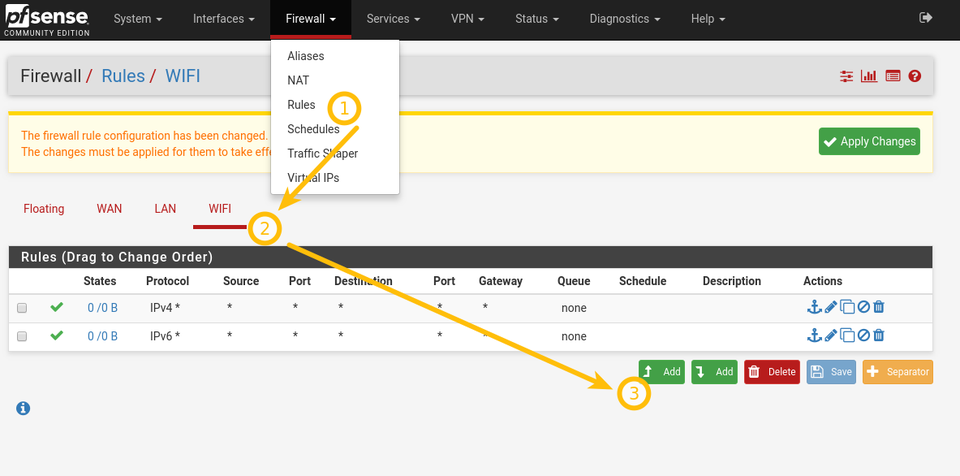
you may need to modify rules in the LAN tab as well.
DHCP pool for WIFI network
You must configure DHCP pool for the newly created WIFI network, otherwise clients will be able to connect, but won't get any IP address.
Go to Services -> DHCP server -> WIFI and follow the instructions on the screenshot.
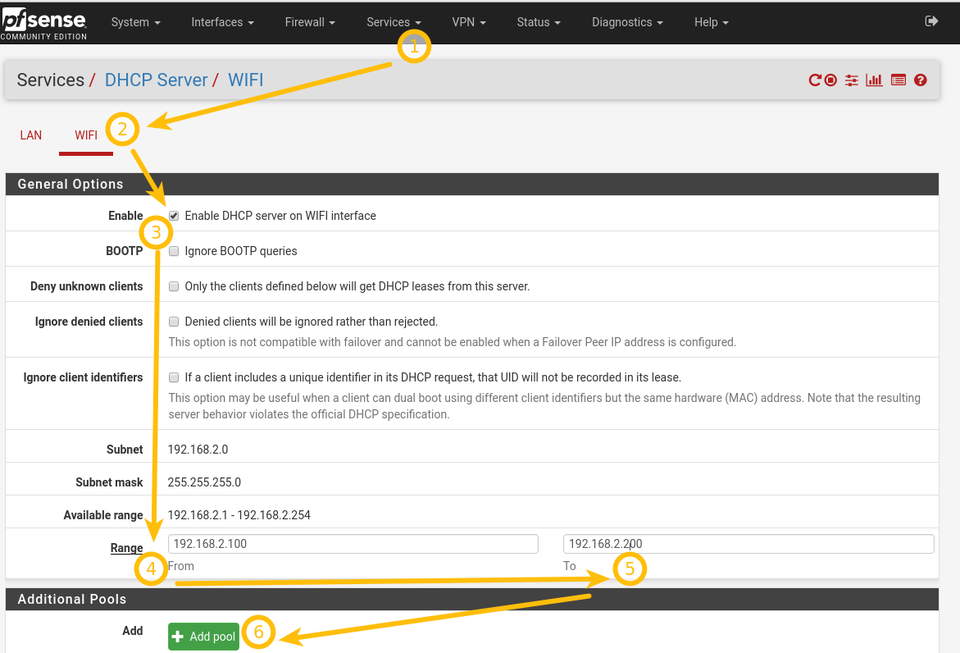
If you followed all the steps, you should be able to see and connect to the "TekLager" wireless network. Since this network is bridged with LAN, you should be able to connect to the internet.
Wi-Fi troubleshooting
If you are not able to connect, check the Firewall logs in Status -> System Logs -> Firewall
wifi connected, but there's no internet
If you are able to connect, but don't get any internet n the conencted device, it most likely means that you have some firewall rules blocking your connection.
Remember that your WIFI and LAN networks are bridged. You need to make sure both your LAN rules and your WIFI rules don't block your connection.
Go to Firewall -> Rules -> WIFI/LAN and see if there are any rules that look suspicious.
wifi network is up, but you can't get an IP address
This means that your DHCP for the WFI network is misconfigured. Go to Services -> DHCP server -> WIFI and make sure the "Enable DHCP server on WIFI interface" checkbox is clicked.
Any other problem?
Feel free to contact us :-)
Good luck!