AX820 Access Point upgrading and troubleshooting
This article will help you troubleshoot and restore your TekLager AX820 Wireless Access Points to factory defaults.
Specifically, it will help you
- Reset the router to factory defaults
- Upgrade the OpenWRT operating system to a newer version
- De-brick the device in case of a corrupted operating system
Restore the Access Point to "factory defaults"
There are two ways to restore the device to the original configuration. One is through a physical "reset" button on the device and the other through the Web UI.
Reset using a physical button
This is the recommended and simpler method.
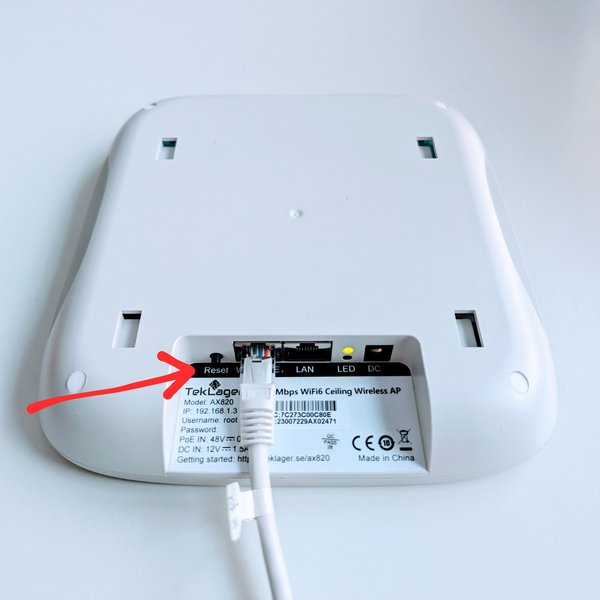
- Locate a small black button labeled "reset".
- Press and hold the button for 10 seconds.
- Release the button.
- The device should now reboot and be accessible within the next 30 seconds.
- Follow the "getting started" instructions to configure it to your liking.
Reset using the web UI (alternative)
If you remember your password and can connect to the web UI, you can perform the reset procedure using the web interface.
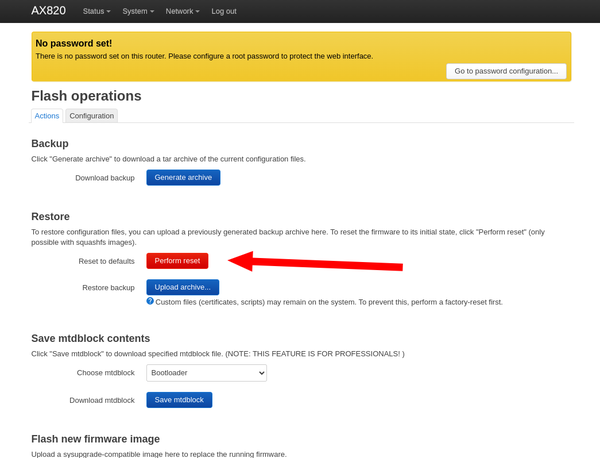
Connect to the web UI at http://192.168.1.3/ (default IP), log in, click System => "Backup / Flash firmware".
Click the red "Perform reset" button. The device should reboot and be available in about 30 seconds.
Upgrade the OS to a newer version.
TekLager regularly publishes new OS images for both AX820 and AX880 Access points.
We recommend these official images because they are tested and are expected to be stable. You can also build and flash your own images, but please be advised that it may result in an inaccessible device and a need of advanced troubleshooting (bottom of this article).
There are two ways of flashing a new OS. Using the Web UI or through SSH.
Upgrade the OS through the web UI
Download the new OS image from the "Downloads" tab on the product page. [link] [link]
Connect to the web UI at http://192.168.1.3/ (default IP), log in, click System => "Backup / Flash firmware".
Click the "Flash new firmware image" button, click "Browser...", select the previously downloaded image and click "Upload". The device may take 1-3 minutes to reflash and reboot. Once completed, please follow the getting started instructions.
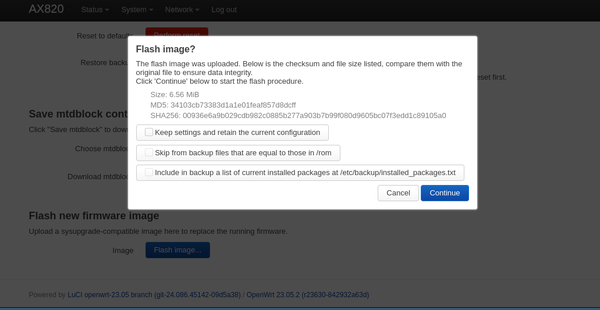
Note: we strongly recommend keeping the "Keep settings and retain the current configuration" unchecked. OpenWRT 23.x.x configuration isn't compatible with OpenWRT 24.x.x, and keeping it may lead to a non-functioning device.
Upgrade the OS through the command line (alternative)
This alternative path of upgrading gives you a little more information in case of upgrade problems. This method is for more advanced users.
- Use SSH or a serial cable to connect to the device.
- Download the image using wget or a similar program to the /tmp directory
- Use the sysupgrade command.
If you are using SSH, you won't be able to see all the log details because the OS will stop all SSH sessions when the upgrade starts. This is expected. The full recording of a successful upgrade can be found here.
If you want to get all the details or troubleshoot a failed upgrade, please use the serial connection (described below).
A recording of a successful upgrade using a serial cable can be found here.
Debricking the device
This is needed only in case you "bricked" the device by flashing a bad image or retained an incompatible configuration during an upgrade.
There are two ways of debricking the device. First, try the easier "failsafe mode" before going for the serial connection.
Debricking method 1: Failsafe mode
Failsafe mode starts the router with the IP address 192.168.1.1, and disables DHCP and wireless connectivity. You will need to set your PC to a static address on the same subnet (e.g., 192.168.1.10) and connect via Ethernet.
Early in the boot cycle, OpenWrt watches for a reset button press inside a specific four second window to indicate that it should enter failsafe mode. (Note: four seconds in 24.10 and later OpenWrt versions, but only two seconds on 23.05 and earlier versions.)
To enter failsafe mode, power on the device, wait for a flashing LED and press the reset button.
Once your device is in failsafe mode, you can ssh and upgrade the OS through the command line.
Debricking method 2: Establish a serial (TTL) connection with the device
This step is needed in most advanced troubleshooting and debricking operations.
You will need a "USB to TTL" cable. We don't sell these cables (yet), but you should be able to buy them elsewhere.
- Open the chassis and find the 4 TTL pins.
- Connect 3 TTL pins correctly
- Use "screen" or "putty" to connect to the device
There are 4 screws on the bottom of the device under the rubber plugs. Lift the plugs, remove the screws using a screwdriver, unclip the plastic clips, and open the chassis.
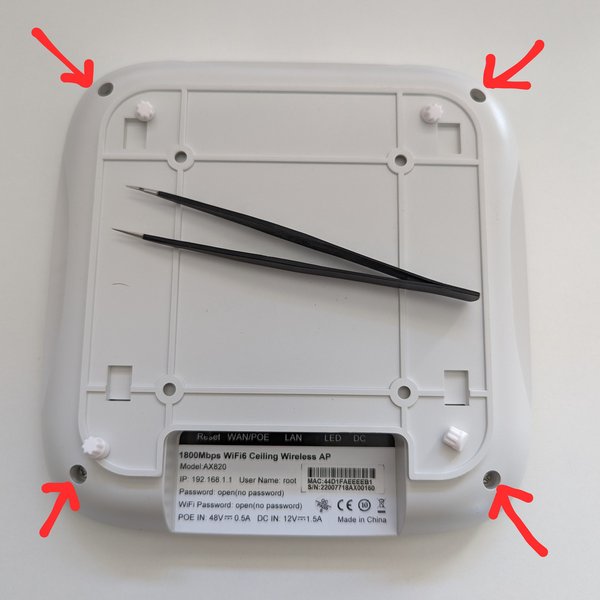
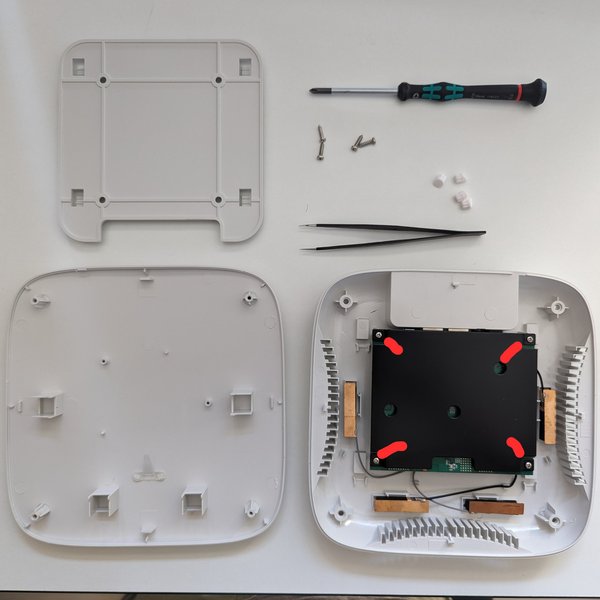
Remove 4 screws holding the motherboard and flip it upside-down to locate the 4 TTL pins.
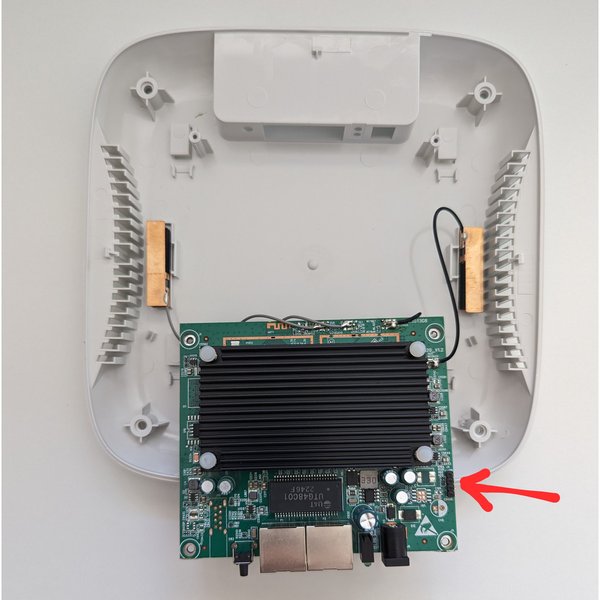
Under no circumstances should the fourth "power 3.3V" pin be connected. It may damage the device. This pin should not be connected.
Only 3 pins need to be connected in the following manner.
| Access Point | USB cable |
| Ground | Ground |
| TX | RX |
| RX | TX |
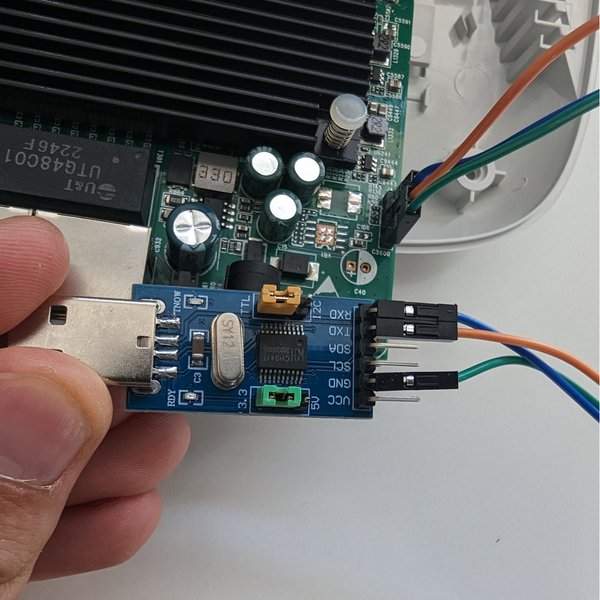
Connect the USB to your computer, power on the access point, and establish a connection using "putty" or "screen".
Once the connection is established, you should be able to see the boot sequence and read the possible error messages.
Here's a recording from a successful boot and reset using the physical button.
If you can't or don't want to recover the existing OS, you will need to reflash a new one.
Flashing a fresh OS on a bricked Access Point
Step by step instructions
- Establish a serial connection as described above
- Connect a network cable between your switch (or computer) and the WAN port on the access point
- Set up a TFTP server on your PC
- Download a good image to the TFTP folder on your PC.
- Power on, select "Upgrade firmware"
- Select TFTP method
- Set an IP for the Access Point that can communicate with your computer
- Type (or paste) the file name of the OS image
- Press enter
If you have configured the TFTP server and entered the IPs correctly, your upgrade should look similar to this recording.