Installing pfSense on APU and TLSense devices
This tutorial should work on Linux, OSX, and Windows.
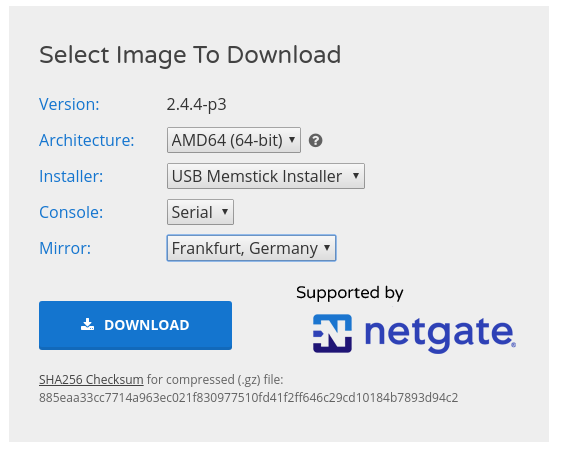
Download the pfSense image
Go to https://www.pfsense.org/download/
If Your device has an HDMI port, select "VGA" in the Console drop-down. Otherwise, select "Serial" to use a serial cable for installation.
TLSense devices have an HDMI port, while APUs have a serial port.
Flash the pfSense image on the USB drive.
If you are using Linux/OSX, you should use dd to prepare the USB stick:
sudo dd if=pfSense-CE-memstick-2.X.X-RC-amd64.img of=/dev/sdX ; sync
Make sure that if= specifies the exact location of the downloaded file and of= specifies your USB device. If you make a mistake here, you might overwrite your hard drive!
If you are using Windows, use Rufus: https://rufus.akeo.ie/
Instructions for devices with a serial cable
If your device has an HDMI cable, skip to the next section

If you have a USB-to-serial cable, it will look like in the picture. Regular null-modem cable also works but looks slightly different.
If you use OSX, ensure your tty device shows up in /dev/. See MacOS instructions here.
If you are using Windows, see the Windows instructions here.
If you are using Linux, you should see the /dev/ttyUSB0, if you have a regular cable, you should see /dev/ttyS0
Verify with ls:
root@homedesktop:# ls /dev/ttyUSB0
/dev/ttyUSB0
All good. Ready to connect.
Connect
Make sure you have putty installed, and start it as root:
sudo putty
If you use Windows, launch putty with administrative privileges.
Enter the values as you see below:
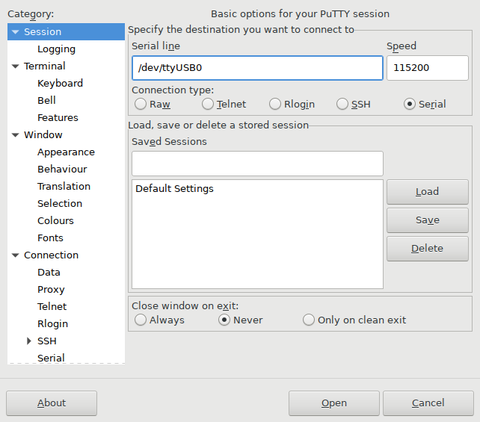
Click "open", and your session should start. It should look similar to this:
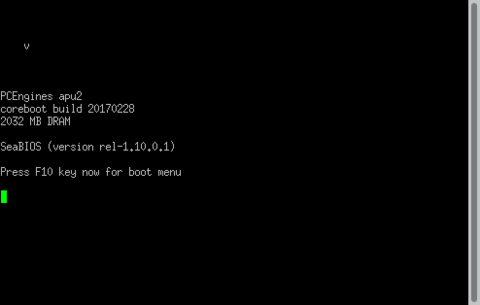
Wait for the USB to boot, and follow the instructions on the screen:
Press F10 to make sure your USB stick has been detected. It should look similar to this:
1. this should be your USB stick
2. here should be your SSD drive
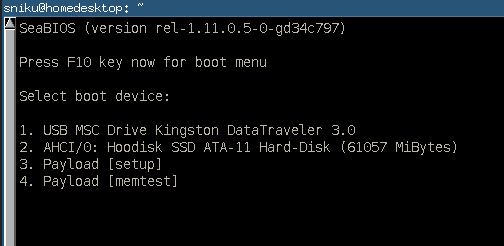
If you do not see the USB stick in the boot menu, it's possible that APU does not support your USB brand.
Some USB sticks simply don't work. Try a different brand.
Press 1 and follow the instructions on the screen.
Note, BIOS will always say, "Booting from Hard Disk..." even if it's booting from USB.
The recording of the installation process is shown below. Note we have installed pfSense with ZFS instead of UFS to minimize the filesystem corruption problem.
Instructions for devices with an HDMI port
You should use a monitor and a keyboard for OS installation for devices with a graphics card. This is generally simpler than using a serial connection.
- Connect the USB stick to a USB port
- Connect a USB keyboard
- Connect a monitor with an HDMI, VGA, or DisplayPort cable, depending on the device you have
- Connect the power cable
The device should now start to boot. Press F11 to enter the Boot Menu. From here, you should see a list of bootable storage devices. If the USB stick is detected, please select it and follow the instructions.
We recommend installing the system using the ZFS filesystem.
Troubleshooting
pfSense 2.5.0 is based on FreeBSD 12.2. This OS has some USB driver bug that often manifests itself by printing
Root mount waiting for: CAM
Root mount waiting for: CAM
Root mount waiting for: CAM
(probe0:umass-sim0:0:0:0): INQUIRY. CDB: 12 00 00 00 24 00
(probe0:umass-sim0:0:0:0): CAM status: CCB request completed with an error
(probe0:umass-sim0:0:0:0): Retrying command, 3 more tries remain
over and over again. This warning appears only when a USB device is connected to APU.
Since you need a USB stick to install pfSense, this can be problematic. About half of my USB sticks don't work due to this bug, but some of them do. If you keep getting this issue, try a different USB brand.
If I find a workaround for this issue, I'll post it here.
Here's a recording from a successful installation: https://asciinema.org/a/392645
Good luck!